Author: DocT

What is Search Engine Optimization? Why does it matter? A guide to SEO for the non-professional. Update 2022.

Search Icon

If you don’t know what SEO is, or maybe you kind of know, but not really, you are the person that this article is written for. My goal is to help you understand what SEO is and why you should care.

What is Search Engine Optimization or SEO?

To understand what SEO is today, we need to start with understanding the journey we took to get us to where we are.  To understand why we need to practice it, we need to understand the relationship between your users, your online presence and the search engines. To keep this something that people will read, I am going to leave a lot out and I am going to take poetic license. My goal is understanding rather than absolutely factual. If you want facts and data, visit “The History of Search Engines”.

Let’s start with the launch of Google in 1998.

If you were a marketer the day before Google launched, your goal was to:

  • create good content that would capture your audience’s attention,
  • satisfy some need that audience had,
  • call them to take action that also met the needs of whatever you were marketing.

Then came Google.

Google and other search engines have become so important because they leveraged emerging technology with the ability that technology gave everyone in the world to publish.  They created a tool to find information that has been published and help you find it using a keyword search.

Simply put, Google was able to map websites on the internet with keywords that were on the page and created rules for deciding which pages to show in a Search Engine Results Page (SERP).  That ability to show up in the top results of a SERP changed the marketing world.  In many cases and for many years the goals of good marketing were replaced by the goal of showing up as the top-ranking site in a SERP. There was a good reason for this, showing up on the first page of a SERP determined if you were going to get traffic, and the closer to the top the better.

Understanding SERPs, the rules for determining what will show up on those pages, and the traffic they generate are at the heart of understanding Search Engine Optimization.

Google’s operating principle is that they want to put links to the best possible pages to satisfy your needs on the SERP when you do a search.  Their ability to put good results in front of you is the key to their success.  They use mathematical rules models called algorithms to decide the best few pages to display out of billions of possible pages they have indexed. These algorithms use ranking factors to determine whether a site is a good match for what you are trying to find.  It is believed that there are over 200 ranking factors that come into play in what is an extremely complicated Search Ecosystem.  Nobody but Google knows exactly how it works, so we look to Google for information about how we can optimize our content for search.

These algorithms are why the practice of Search Engine Optimization came into existence.  Since the late 1990s there has been a cat and mouse game between search engines and search marketers.  The goal of the search engines is to give good results, the goal of the search marketers is to be included in those results.  So as search marketers learned about algorithms, they found ways to exploit them.

In the early days, before we were able to distinguish between traffic and quality traffic, the goal was to get as much traffic to your website as possible.  The type of traffic didn’t matter because all we could measure is how many times someone came to your site and we had no clue as to what they were doing there.  Search Marketers with their eye on traffic at any cost started to manipulate the content of their sites to show up in Search Results at any cost.  This was the beginning of Search Engine Optimization, and the memory of what was done in those early days leaves a bad taste in my mouth related to the term SEO.  There were practices in those early days where websites would list keywords on their pages that had nothing to do with the content of their sites, just to generate traffic through SERP results.  And it was effective in many cases.

But we need to keep in site that the goal of the search engine was to put the best sites to match the user’s need in the SERP.  What they found is that the result of search marketers manipulating the content, with a focus on the algorithms and the SERP results, led to a poor quality of results.  And so, the search engines began to shift and change their algorithms to focus on providing quality links.

It has now been 25 years since the launch of Google and search has become an incredibly sophisticated industry.  There have been many major shifts along the way, and each time there is a major shift, the content of your website is scrutinized in a different way.  Techniques that were used in SEO a year or two or five years ago to help you show up in the top of search results can now get you penalized up to the point where your site can be removed from the search engine index, so it can’t be found at all.

Along the way the search engines have gotten very good at providing quality links in their SERPs.  And Search Engine Optimization has become a very different field.  Amazingly, it has evolved back to where it was the day before Google came on the scene.  We no longer create content or manipulate it with a focus on search engines.  Instead, we work with people to:

  • create good content that will capture your audience’s attention
  • satisfy the need of the audience
  • call users to take action that also met the needs of the marketer
  • understand and apply visible and behind the scenes technical requirements that allow the search engines to understand the content and categorize it as quality content for people searching for whatever it is we are marketing

A more appropriate term for SEO today would simply be Search Marketing, but we often still use the term SEO since it is the legacy term for the industry.

We have also evolved in the way we look at traffic. Where once we looked at any traffic as good traffic, we are now able to look at the behavior of the traffic that comes to our site with a lens of whether it is quality traffic.  Quality traffic represents those people who are most likely to be interested in whatever we are marketing. 

One person who is interested in buying my product is more valuable than a million who could care less.

Why Does SEO Matter?

SEO is about creating quality content that the search engines understand and can place in front of the right people to generate quality traffic to our site.  And while that is a pretty basic premise, the practice has gotten more and more complicated as search engines have emerged.

But why does it matter?

The Internet has become the primary tool for connecting businesses with their prospective and current clients and customers.  It is used more and more every day, and search engines are the first place that most people turn when they are looking for goods, services, or answers.  That means that if you are going to be found, you need to have an online presence that supports you showing up in SERPs when people are looking for what you have to offer.

I believe search marketing needs to be looked at as a journey, not a destination.  If you want to get a quick glimpse of what I am talking about, go to your phone and visit a website that was created several years ago and hasn’t been updated. You have probably landed on a site that wasn’t mobile friendly, and found it virtually impossible to view or use. What did you do when that happened? Did you leave, or did you struggle to use the site. Most people leave, and the algorithms track that and use it as data to score the quality of your site. Remember, quality of content and user experience are crucial ranking factors.

I had a student that described SEO as being similar to auto maintenance.  “You don’t always know what they are doing, or why they are doing it, but if you don’t do it you will eventually pay the price”. This is actually a pretty good analogy.  When I was young, I could completely take apart and rebuild an auto engine.  I knew what everything was and how it fit into the various systems in the car.  Today, I drive a hybrid electric car.  I’m not even sure that I have opened the hood because it has evolved beyond my ability to understand and fix it.  When I need help beyond the normal functions that I need to use to have the car function, I go to a professional.  Search marketing and maintaining your online presence is kind of like that.

There are a lot of areas that need to be considered when you are talking about search marketing. Think of search marketing as an active interaction with a system of systems. Roughly, these systems can be grouped into these general areas of a larger search ecosystem:

  • On-the-page SEO
  • Off-the-page SEO
  • Reputation Management
  • Social and Video
  • Local Search
  • Paid Search

We don’t have enough room here to go into each of these areas. Each of these areas have sub-areas where professionals specialize.  And there are many careers that are emerging as this technology matures.  As a professor that teaches marketing technology, I turn to many professionals on a regular basis just to make sure that my students are getting current information in my classes.  If you are reading this article thinking about a career in Search Marketing, then my suggestion is that you be prepared for a career where you are always learning.

If you are reading this wanting to know how to use SEO to improve the return on investment of your marketing efforts, I would suggest finding someone who does this stuff for a living unless you have all your time to invest in learning and staying current in understanding the search ecosystem.  When you reach out to those professionals, be careful about anyone who promises to give you immediate results or guaranteed placement on the first page of the SERPS, because it simply doesn’t work that way anymore.

Look for someone who wants to understand your business, your clients/customers, and understands how modern marketing is really just traditional marketing that has gone through a technological revolution.

About the Author:

Dr. Kevin W. Tharp is a Professor of Digital Marketing Technology where he was the creator and is now the Program Director of the first and still only Bachelor’s degree in Digital Marketing Technology at the University of Wisconsin-Stout.  Kevin has worked in media since 1987, the internet since 1994, and has been teaching marketing technology since 2006.  He owns Kevin W. Tharp, LLC. which is a consulting firm focused on emerging trends in digital marketing.

This article originally appeared in August 23, 2018 and has been updated to be more current.
Avoid being cloned: Do a Cross Platform Privacy Checkup

Report a cloned account

Have you been “hacked” and someone created an account imitating you? This is called cloning, and usually it doesn’t mean that someone has “hacked” your account, but that they have created a clone account using your name, photos, and other information. The reason they were able to do this is that you may be loose with access to your data.

In this article, I will walk you through a Cross Platform Privacy Checkup. The videos were created for my marketing analytics class, so some of the content is specifically target to what I want my students to do, but you can learn a lot from watching the videos and doing the privacy checkup on your accounts (you just won’t be able to join the discussion). The videos go through how to access and take control of your data on platforms like Alexa, Google, Amazon, Meta (Facebook), etc.

It is easy to understand why someone can get caught with their data defences down, this stuff has come on quickly and it changes often. In fact, by the time you see this post, it is likely that some of the steps or options that I illustrate below will have changed in location or are called something different. But the key thing to understand is that you have options that allow you to control who has access to your data. In the process you will protect yourself, but you will also be able to protect your friends because that is how it spreads.

There are two videos below that I created for my analytics class, the first is 15 minutes, the second is about 7 minutes that will walk you through how to find your privacy settings on a number of common platforms we use. I’ll link to the videos first, then below the videos I will show you what a clone attack looks like and the immediate things you should do if you or someone you know has been cloned.

Cross Platform Privacy Checkup Video 1
Cross Platform Privacy Checkup Video 2

An example of a cloning, and what to do about it

I have asked my friend for permission to use this example of a cloning attack.

This morning I sat down to have my coffee, and this showed up in my feed.

“I’ve been hacked”

If you use Facebook, you have seen this type of message. There is a good chance that you have posted this kind of message. When this message was posted, the audience was “Public” so anyone could see and post to the message. Within minutes there were numerous replies to the message saying contact this person or that person to get your account back. Don’t click on those posts if you see them, they are most likely scams or links to malware that will install on your computer. I called Larry and told him he needed to change the audience so that it was only visible to friends to stop these malicious posts. You can see in the image above that the posting has been changed from Public

to Friends

and that stopped the strangers from posting comments to his post. You can tell by the icon that is next to the posting time what the audience is for each post. To understand the icons, you can visit Select your audience on Facebook.

Generally speaking, you should only post things using the Public setting if you want the whole world to see it.

If you get a friend request that seems suspicious

The first thing to state here, is that for most people, it is not a good idea to accept friend requests from people you do not know. But often a friend request is from someone you think you know. Sometimes it is your friend, sometimes it is a cloned account. The first thing I did when I saw Larry’s post was to search his name in Facebook. That showed me that 1) I was already friends with Larry and 2) that I had a friend request from the clone account.

Facebook Search showing Larry’s account and the clone account along with a friend request from the cloned account.

If you are unsure if this is an authentic account, do not confirm the request. If you do, then they will have access to the data in your account that is available to your friends. If your settings are loose it may also give them friend level access to your friend’s accounts. The promiscuous sharing of your friend’s data is how this spreads. They can then create cloned accounts of your friend’s accounts as well. But, there are ways of changing the settings that will stop them from having access to your friend’s data.

In your Facebook Profile Information, you have control of what of your data the world is able to see. In the “Friends and Following” portion of the Facebook Privacy Checkup, you have the ability to limit this access (see videos above for further details). You will see in the image below, that I have my account set to “Only Me” so that nobody else can see my friends and their data. Changing this setting to “only me” will limit the ability for cloners to do damage through your account and will make your account less appealing as a target for cloning because they will not have a list of targets to invite to your cloned account. In other words, there is nothing to gain and they will move on to easier targets.

This is one of the most important steps you can take to protect your friends from being cloned.

What to do when you have received a request from a bogus account

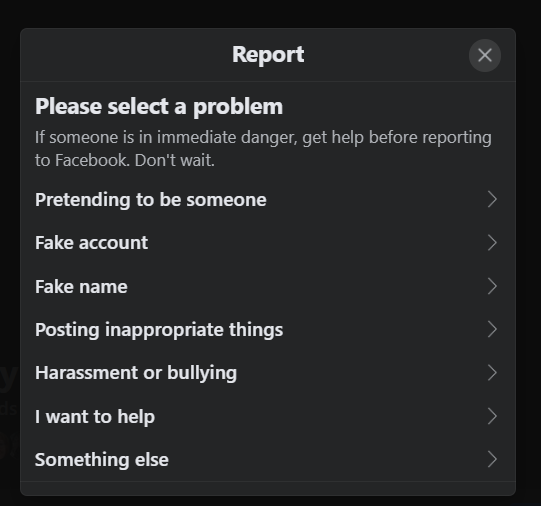
When you have received a request to a bogus account, you have the ability to report that account to Facebook. This is the first step you should take to help your friend stop the progress of the bogus/cloned account. When you click on the name of the person who sent the request, it will bring you to their profile. There you will have access to report the account.You should report the account if you are sure it is not your friend’s legitimate account. To report the bogus account, click on the … Icon and it will bring you to the “! Find support or report” option. Click on that and follow the prompts.

One of the options is “Pretending to be someone”.

After you have reported the account, you can delete the request and block the account if you wish. At this point, you should do a privacy checkup on your account to help ensure that you are controlling who has access to your data. The Facebook Privacy Checkup will allow you to take control of your data and may prevent you from having to deal with a cloned account.

Categories: Analytics

Working with Menus in your WordPress Site

Part of the WordPress Beginners Series

Update: Since this article was published, WordPress has introduced a new type of template that requires you to look in other places to set up the menus for some sites. If you do not see Menus in the “Appearance” section of your WordPress site, it is likely because you have used one of the new style templates. If that is the case, then you will need to follow the information available in this video: “Menus No longer available under Appearance in WordPress“.

In the post “Adding Navigation Menus to WordPress” I showed you how to go in and create that base level navigation menu. Now that my site has started to take on a bit more content, I have decided to create a page dedicated to the WordPress Beginners Series, and so I want to change that menu so it more closely reflects how I want my users to view my website.

I had previously chosen to have my menu display categories, and to have top level pages automatically added to my menu. Along the way, I decided to start publishing this WordPress Beginners Series. I wanted to highlight this beginners series in my site, so I decided to create a page so I would have better control of how the information about the pages I add to that series are presented.

A page allows me total flexibility, but a Category page is automated to post links to posts tagged with a specific category. See the difference here:

This link is to the page and has the url https://kevinwtharp.com/wordpress-beginners-series/

This link is to the category page and has the url https://kevinwtharp.com/category/wordpress/beginners/

When I created the top level page, it was automatically added to the Menu because I had selected that option. The result was that I had a page and a category page both linked from the Main Menu with the same words but going to different places.

So following the rule of form follows function I decided to change my menu to include the page as a top level menu option because I wanted to include more information than the content of the posts with the correct category, and I wanted to direct my users to that page.

The video below walks you through the process of updating the menus in WordPress, and goes into additional information about the use of automated content versus specific content in menus in WordPress.

Learn to Blog: A Blog Post to get you started

WordPress Beginners Series

A blog is a place that you can write an article. Historically a blog was presented in chronological order by publish date, but with categories and tags there is much more flexibility.

This article will walk you through what you need to know to start your journey of posting a blog. It focuses on the basics, what are the types of content, and how do you use them to create a blog post.

Where to Start?

This article assumes you already have a WordPress site up, and that you are using the block editor for adding content.

The very first thing you need to do is to log into your WordPress site. Once you are logged in, go to the Dashboard. When you are logged into your site, you can access the Dashboard from anywhere, by clicking on the WordPress Logo in the upper left corner. Here are two ways that it might look.

Click on the WordPress Logo “W” in a circle to access the Dashboard.

From the Dashboard, you will go into the Posts Menu. You can click on it or hover over it to get access to create a new post. Clicking on it will bring up a list of the blog posts that have already been posted.

The Posts Menu lets you Manage your Blog posts and related content such as Categories and Tags

From here, you click “Add New” and it will bring you into the Block Editor. The Block editor is a tool for creating a post (or page) by choosing the types of content you will add to your page as you are writing. The image below is what it will look like.

To add that image, I chose an “Image” block by selecting the + icon and choosing image. We will discuss the types of blocks available below.

What kind of content do you want on the page?

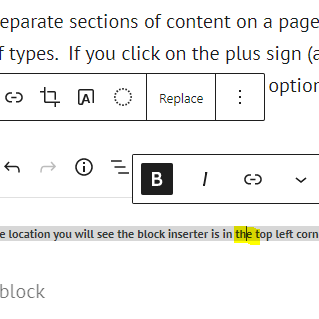
In WordPress, the separate sections of content on a page are currently called blocks. Blocks can be a number of types, they are called blocks because they are the building blocks of the page content. If you click on the plus sign (anywhere you see it when editing in the WordPress Block Editor), it will give you the options.

One location you will see the block inserter is in the top left corner next to the WordPress Icon.

This is a heading

Headings are a way of organizing the content on your page. People find it easier to read when there are headings in online content. It also organizes your content into sections so that search engines can better understand the content on your page. This matters because if you want people to find your site through sites like Google, it has to be created in ways that work with the search engines instead of against them.

Different types of blocks have different options

Depending upon what type of block you are editing, there are different options. There are often options menus that show up. The options are “context specific”, so the options that show up will depend upon where your cursor is at that moment.

In the images below, the first image shows the options available when an image is selected, these are highlighted in yellow. In the second image, the cursor is located in the text of the image’s caption, so the options for both the caption and for the image are available. That is because a caption is considered as part of an image block.

The types of blocks that are available in the free account are categorized into:

  • Text
  • Media
  • Design
  • Widgets
  • Theme
  • Embeds
  • Crowdsignal

The full list of block types is available by clicking on the Toggle Block Inserter icon at the top left of the page.

Notice on the list of block types, you can also add patterns. Patterns are pre-established block patterns that are commonly used, potentially saving you design time.

More Settings

On the right side of the page, you can edit the properties of each block when that block is selected. If you cannot see the additional settings, you can click the elipse in the block properties editor and turn on the More Settings option. It will turn on a menu on the right side of the page with details about the options for whatever you have selected at the time.

This image shows the “More Settings” options menu for the Paragraph Block Type.

Save and Publish Your Post, then test to make sure it is published

Your work is not available on the web until you have published it. To publish your blog post, you will need to click the Publish Button in the upper right corner. Depending upon how your WordPress site is set up, it may bring you through a checklist of things before it actually publishes.

If you click Preview, it will give you a Preview url, that looks something like the address below. This is only visible to you, not to the world.

The proper url for this page is

Untill you are more familiar with using WordPress, it is a good idea to always check your page to see if it is visible to the world. When you are logged in and editing your post, your credentials for editing the site are held in the browser. Opening the url with an Chrome “Incognito”, Edge “InPrivate”, or other privacy window will allow you to see what the page looks like to people who are not logged into the blog.

Chrome Incognito Window is found under the three dot elise

For more help for the beginning blogger, please visit my WordPress Beginners Series

Setting up and using a free WordPress site.

WordPress Beginners Series: Setting up a host

There are a lot of places where you can have a WordPress Site hosted. I use WordPress as a tool for my students to use in several of the classes I teach in the BS in Digital Marketing Technology at UW-Stout. The main reason I am creating this WordPress Beginners Series is to provide very quick and to the point tutorials for specific tasks that are common for WordPress Beginners and for my students.

There are plenty of places out on the Web where you can learn about WordPress. For instance this article is one I used to help me compare the WordPress hosting options. To be frank, there is a lot to think about when you are choosing a host. Perhaps the most important is to look forward to how you will be using the site. Look past the obvious offer of free hosting to see if it is a trial period, or if it is a longer term. Look at the cost of hosting if you decide to move past the free offering, and look at what is not available for free hosting.

For instance, for my classes that are just doing basic blogging, WordPress.com is a great option. But if you are wanting to add Google Analytics or work with any type of plugin for SEO, those things are not available on the free plan. Looking at the pricing, WordPress.com doesn’t let you install plugins until you reach the Business pricing of $25 a month (at time of this posting).

I have personally recently switched to bluehost.com after having previously been with GoDaddy for a long time. The reason I left GoDaddy, they wanted to charge around $100 a year for SSL, a service that is often offered for free by hosting providers. So my change, was purely economic. But migrating from one host to another comes with a lot of headaches, more on that in a someday to be written post.

Getting Started – Set up a Free WordPress site

Let’s start at the very beginning. To have a website on the Internet, you must have a host or provider. For this post, we are having you use a free account provided by WordPress.com. The video below goes through the process of setting up your free account on WordPress.com.

Adding Navigation Menus to WordPress

1 Comment

Part of the Setting up your Site Series for WordPress Beginners

WordPress has a lot of different interfaces, all built upon the same frame. If you are working with WordPress, you will find that there are usually multiple ways of doing the same thing, and they all look different, but have the same main elements.

Today the main element we are talking about is Menus.

Menus

Part of the “Appearance” aspect of WordPress, Menus are customizable content areas with a great deal of flexibility both in what they contain and where they can appear on the page. Each theme treats them differently, so the important thing to understand is that they are part of navigation plan that gives users access to your site. There are many schools of thought about how, when, where and why of menus. But the important thing is that they are considered and functional.

WordPress has some useful tools for providing automated menu generation based on the clicking of options in setup pages.

In this video, I walk you through setting up a basic first menu for this website, kevinwtharp.com.

Embedding YouTube Video in WordPress using Custom HTML block element.

So the YouTube Embed widget isn’t working in our version of WordPress. We can use another block element to embed it. That element is called “Custom HTML”, and it allows you to paste the embed code from YouTube Videos, and other places that provide you with embed code.

When you select that block element, it will look like the section below. In the image, I have included the code I used to embed the video below. You can see that it provides you with an HTML view and a Preview view. The HTML view lets you see the code (top image), the Preview mode lets you see what it will look like after it applies the embed code (bottom image).

The Custom HTML block element in HTML code view mode
The Custom HTML block element in Preview view mode

Add Google Analytics to WordPress w/ Monster Insights

I recently did a major update to my website to make it more current, and to clean out a lot of old materials I used for teaching over the last 15 years that are no longer useful. In the process I changed my provider and did a clean install of WordPress. I wanted to continue using the Google Analytics Account I have been using for years, so I needed to add the tracking code to my new WordPress site. The video below captures that process and allows you to see how that process works.

I used Monster Insights’ free account that came preinstalled as a plugin on my new site. It allowed me to quickly utilize their Wizard to go through the process. This required me to have an existing Google Analytics Account, Property, and View already set up.

Categories: Analytics Wordpress

Embed Google Data Studio Report in WordPress

Learn how to embed a Google Data Studio Report into WordPress page or post using a custom html block to add the embed code. There is a embed block type, but it does not appear to work for embedding the reports that we set up in our Data Studio Lab that show the data from our YouTube channel (I am not sure why, but it doesn’t).

The first thing you need is your YouTube Channel up and running with publicly visible videos that have been posted and viewed.

The second thing you need is to have your Google Data Studio account set up and a YouTube Channel Data Report as outlined in my Data Studio – YouTube Channel Lab.

Below is an example of how this will look when you are done. Below that is a YouTube video with directions to walk through preparing the report to be shared and embedded in a WordPress site.

A YouTube Channel Report created in Google Data Studio

YouTube Video showing how to use embed code from Data Studio

Incidentally, I also had to use the Custom HTML block to embed this video as well. The YouTube Widget did not work as planned. But we know how to get around that now too.