Update: Since this article was published, WordPress has introduced a new type of template that requires you to look in other places to set up the menus for some sites. If you do not see Menus in the “Appearance” section of your WordPress site, it is likely because you have used one of the new style templates. If that is the case, then you will need to follow the information available in this video: “Menus No longer available under Appearance in WordPress“.
In the post “Adding Navigation Menus to WordPress” I showed you how to go in and create that base level navigation menu. Now that my site has started to take on a bit more content, I have decided to create a page dedicated to the WordPress Beginners Series, and so I want to change that menu so it more closely reflects how I want my users to view my website.
I had previously chosen to have my menu display categories, and to have top level pages automatically added to my menu. Along the way, I decided to start publishing this WordPress Beginners Series. I wanted to highlight this beginners series in my site, so I decided to create a page so I would have better control of how the information about the pages I add to that series are presented.
A page allows me total flexibility, but a Category page is automated to post links to posts tagged with a specific category. See the difference here:
When I created the top level page, it was automatically added to the Menu because I had selected that option. The result was that I had a page and a category page both linked from the Main Menu with the same words but going to different places.
So following the rule of form follows function I decided to change my menu to include the page as a top level menu option because I wanted to include more information than the content of the posts with the correct category, and I wanted to direct my users to that page.
The video below walks you through the process of updating the menus in WordPress, and goes into additional information about the use of automated content versus specific content in menus in WordPress.
A blog is a place that you can write an article. Historically a blog was presented in chronological order by publish date, but with categories and tags there is much more flexibility.
This article will walk you through what you need to know to start your journey of posting a blog. It focuses on the basics, what are the types of content, and how do you use them to create a blog post.
Where to Start?
This article assumes you already have a WordPress site up, and that you are using the block editor for adding content.
The very first thing you need to do is to log into your WordPress site. Once you are logged in, go to the Dashboard. When you are logged into your site, you can access the Dashboard from anywhere, by clicking on the WordPress Logo in the upper left corner. Here are two ways that it might look.
Click on the WordPress Logo “W” in a circle to access the Dashboard.
From the Dashboard, you will go into the Posts Menu. You can click on it or hover over it to get access to create a new post. Clicking on it will bring up a list of the blog posts that have already been posted.
The Posts Menu lets you Manage your Blog posts and related content such as Categories and Tags
From here, you click “Add New” and it will bring you into the Block Editor. The Block editor is a tool for creating a post (or page) by choosing the types of content you will add to your page as you are writing. The image below is what it will look like.
To add that image, I chose an “Image” block by selecting the + icon and choosing image. We will discuss the types of blocks available below.
What kind of content do you want on the page?
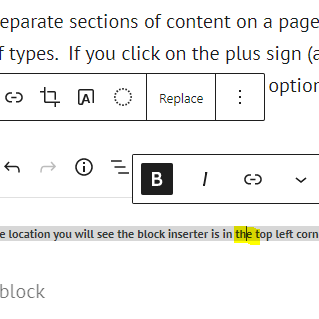
In WordPress, the separate sections of content on a page are currently called blocks. Blocks can be a number of types, they are called blocks because they are the building blocks of the page content. If you click on the plus sign (anywhere you see it when editing in the WordPress Block Editor), it will give you the options.
One location you will see the block inserter is in the top left corner next to the WordPress Icon.
This is a heading
Headings are a way of organizing the content on your page. People find it easier to read when there are headings in online content. It also organizes your content into sections so that search engines can better understand the content on your page. This matters because if you want people to find your site through sites like Google, it has to be created in ways that work with the search engines instead of against them.
Different types of blocks have different options
Depending upon what type of block you are editing, there are different options. There are often options menus that show up. The options are “context specific”, so the options that show up will depend upon where your cursor is at that moment.
In the images below, the first image shows the options available when an image is selected, these are highlighted in yellow. In the second image, the cursor is located in the text of the image’s caption, so the options for both the caption and for the image are available. That is because a caption is considered as part of an image block.
The types of blocks that are available in the free account are categorized into:
Text
Media
Design
Widgets
Theme
Embeds
Crowdsignal
The full list of block types is available by clicking on the Toggle Block Inserter icon at the top left of the page.
Notice on the list of block types, you can also add patterns. Patterns are pre-established block patterns that are commonly used, potentially saving you design time.
More Settings
On the right side of the page, you can edit the properties of each block when that block is selected. If you cannot see the additional settings, you can click the elipse in the block properties editor and turn on the More Settings option. It will turn on a menu on the right side of the page with details about the options for whatever you have selected at the time.
This image shows the “More Settings” options menu for the Paragraph Block Type.
Save and Publish Your Post, then test to make sure it is published
Your work is not available on the web until you have published it. To publish your blog post, you will need to click the Publish Button in the upper right corner. Depending upon how your WordPress site is set up, it may bring you through a checklist of things before it actually publishes.
If you click Preview, it will give you a Preview url, that looks something like the address below. This is only visible to you, not to the world.
The proper url for this page is
Untill you are more familiar with using WordPress, it is a good idea to always check your page to see if it is visible to the world. When you are logged in and editing your post, your credentials for editing the site are held in the browser. Opening the url with an Chrome “Incognito”, Edge “InPrivate”, or other privacy window will allow you to see what the page looks like to people who are not logged into the blog.
Chrome Incognito Window is found under the three dot elise
There are a lot of places where you can have a WordPress Site hosted. I use WordPress as a tool for my students to use in several of the classes I teach in the BS in Digital Marketing Technology at UW-Stout. The main reason I am creating this WordPress Beginners Series is to provide very quick and to the point tutorials for specific tasks that are common for WordPress Beginners and for my students.
There are plenty of places out on the Web where you can learn about WordPress. For instance this article is one I used to help me compare the WordPress hosting options. To be frank, there is a lot to think about when you are choosing a host. Perhaps the most important is to look forward to how you will be using the site. Look past the obvious offer of free hosting to see if it is a trial period, or if it is a longer term. Look at the cost of hosting if you decide to move past the free offering, and look at what is not available for free hosting.
For instance, for my classes that are just doing basic blogging, WordPress.com is a great option. But if you are wanting to add Google Analytics or work with any type of plugin for SEO, those things are not available on the free plan. Looking at the pricing, WordPress.com doesn’t let you install plugins until you reach the Business pricing of $25 a month (at time of this posting).
I have personally recently switched to bluehost.com after having previously been with GoDaddy for a long time. The reason I left GoDaddy, they wanted to charge around $100 a year for SSL, a service that is often offered for free by hosting providers. So my change, was purely economic. But migrating from one host to another comes with a lot of headaches, more on that in a someday to be written post.
Getting Started – Set up a Free WordPress site
Let’s start at the very beginning. To have a website on the Internet, you must have a host or provider. For this post, we are having you use a free account provided by WordPress.com. The video below goes through the process of setting up your free account on WordPress.com.
Part of the Setting up your Site Series for WordPress Beginners
WordPress has a lot of different interfaces, all built upon the same frame. If you are working with WordPress, you will find that there are usually multiple ways of doing the same thing, and they all look different, but have the same main elements.
Today the main element we are talking about is Menus.
Menus
Part of the “Appearance” aspect of WordPress, Menus are customizable content areas with a great deal of flexibility both in what they contain and where they can appear on the page. Each theme treats them differently, so the important thing to understand is that they are part of navigation plan that gives users access to your site. There are many schools of thought about how, when, where and why of menus. But the important thing is that they are considered and functional.
WordPress has some useful tools for providing automated menu generation based on the clicking of options in setup pages.
In this video, I walk you through setting up a basic first menu for this website, kevinwtharp.com.
So the YouTube Embed widget isn’t working in our version of WordPress. We can use another block element to embed it. That element is called “Custom HTML”, and it allows you to paste the embed code from YouTube Videos, and other places that provide you with embed code.
When you select that block element, it will look like the section below. In the image, I have included the code I used to embed the video below. You can see that it provides you with an HTML view and a Preview view. The HTML view lets you see the code (top image), the Preview mode lets you see what it will look like after it applies the embed code (bottom image).
The Custom HTML block element in HTML code view modeThe Custom HTML block element in Preview view mode