Learn to Blog: A Blog Post to get you started
WordPress Beginners Series
A blog is a place that you can write an article. Historically a blog was presented in chronological order by publish date, but with categories and tags there is much more flexibility.
This article will walk you through what you need to know to start your journey of posting a blog. It focuses on the basics, what are the types of content, and how do you use them to create a blog post.
Where to Start?
This article assumes you already have a WordPress site up, and that you are using the block editor for adding content.
The very first thing you need to do is to log into your WordPress site. Once you are logged in, go to the Dashboard. When you are logged into your site, you can access the Dashboard from anywhere, by clicking on the WordPress Logo in the upper left corner. Here are two ways that it might look.

From the Dashboard, you will go into the Posts Menu. You can click on it or hover over it to get access to create a new post. Clicking on it will bring up a list of the blog posts that have already been posted.

From here, you click “Add New” and it will bring you into the Block Editor. The Block editor is a tool for creating a post (or page) by choosing the types of content you will add to your page as you are writing. The image below is what it will look like.

To add that image, I chose an “Image” block by selecting the + icon and choosing image. We will discuss the types of blocks available below.

What kind of content do you want on the page?
In WordPress, the separate sections of content on a page are currently called blocks. Blocks can be a number of types, they are called blocks because they are the building blocks of the page content. If you click on the plus sign (anywhere you see it when editing in the WordPress Block Editor), it will give you the options.

This is a heading
Headings are a way of organizing the content on your page. People find it easier to read when there are headings in online content. It also organizes your content into sections so that search engines can better understand the content on your page. This matters because if you want people to find your site through sites like Google, it has to be created in ways that work with the search engines instead of against them.
Different types of blocks have different options
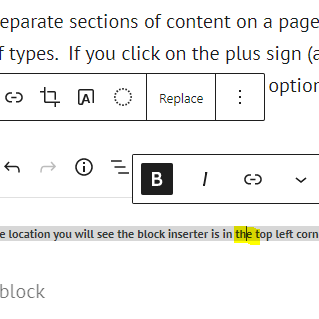
Depending upon what type of block you are editing, there are different options. There are often options menus that show up. The options are “context specific”, so the options that show up will depend upon where your cursor is at that moment.
In the images below, the first image shows the options available when an image is selected, these are highlighted in yellow. In the second image, the cursor is located in the text of the image’s caption, so the options for both the caption and for the image are available. That is because a caption is considered as part of an image block.


The types of blocks that are available in the free account are categorized into:
- Text
- Media
- Design
- Widgets
- Theme
- Embeds
- Crowdsignal
The full list of block types is available by clicking on the Toggle Block Inserter icon at the top left of the page.

Notice on the list of block types, you can also add patterns. Patterns are pre-established block patterns that are commonly used, potentially saving you design time.

More Settings
On the right side of the page, you can edit the properties of each block when that block is selected. If you cannot see the additional settings, you can click the elipse in the block properties editor and turn on the More Settings option. It will turn on a menu on the right side of the page with details about the options for whatever you have selected at the time.


Save and Publish Your Post, then test to make sure it is published
Your work is not available on the web until you have published it. To publish your blog post, you will need to click the Publish Button in the upper right corner. Depending upon how your WordPress site is set up, it may bring you through a checklist of things before it actually publishes.

If you click Preview, it will give you a Preview url, that looks something like the address below. This is only visible to you, not to the world.

The proper url for this page is

Untill you are more familiar with using WordPress, it is a good idea to always check your page to see if it is visible to the world. When you are logged in and editing your post, your credentials for editing the site are held in the browser. Opening the url with an Chrome “Incognito”, Edge “InPrivate”, or other privacy window will allow you to see what the page looks like to people who are not logged into the blog.
